Before wool can be made into yarn, the fibers have to be aligned and held together in a shape that is easy to twist on a spindle. Because the wool fibers I had were so short, I had to make rolags - tightly rolled tubes of carded wool - instead of the usual roving, which is more like a long strip of fiber all carded in the same direction. This is done by first laying out a layer of fiber on the top end of the carding brush until the teeth are just barely covered.

Next, the fibers are carded, transferring back and forth between the two brushes until they are aligned. The top of the empty brush is used to roll the fibers down the loaded brush until a tube is formed and the rolag can be removed.
Making a tight rolag, where the fibers are not constantly in danger of separating, was one of the hardest techniques I had to learn.

The rolags can then be used to spin yarn. I used a bottom-whorl drop spindle - one where the wooden wheel, or whorl, is at the end of the rod furthest from the hook the yarn is fed through. In a top-whorl drop spindle, the whorl will be on the end closest to the hook.
A drop spindle is used by giving the shaft a hard spin, then drafting (lightly separating) out the fibers and feeding them into the yarn, creating a tightly-twisted strand as the spindle is lowered.

The whorl on my (cheap) spindle was fairly small and light, making it difficult to get a lasting spin, so I had to use a different method for my yarn.
I started by twisting the yarn already on the spindle until it began to wrap onto itself. Then, I held the spindle between my knees and pulled the rolag upward, drafting and feeding into the yarn until it reached the right level of twist. This process would be repeated until I ran out of rolags, with the finished yarn being wrapped onto the shaft as I went.

When I first started spinning, the single-ply yarn came out very thick and uneven, and it wasn't very strong. As I got better at spinning a thin, consistent yarn, I started plying the threads together. This made the yarn much stronger and bulkier.

Plying was the easiest part of making yarn. After spinning two strands of single-ply, each made with about five rolags, I wrapped them onto wooden rods to keep them separated and make it easier to feed them onto the spindle. The ends were tied together and attached to the hook, where their strong twist made it easy to wrap them into a two-ply yarn with just a light spin of the drop spindle.

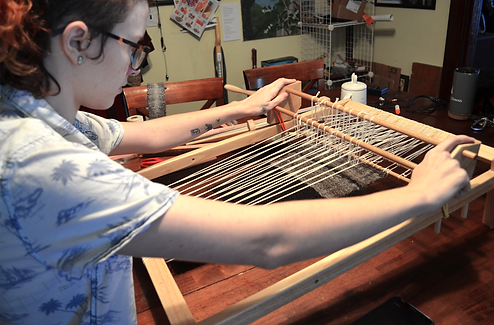
Compared with the yarn-making process, weaving was fairly simple. The hardest part was learning to keep the edges even and not pull the weft (horizontal thread) too tight. I ended up making my own shuttle, for passing the weft between the warp, and comb, for pressing the weft threads together, with some scrap wood.
Here, you can see the method I found most effective for keeping the edges straight. Rather than pulling each row of weft tight as I wove, I made loose "hills" with the yarn, pushing them down with the comb once I had finished five rows or so.

The shed-change device, which I am holding in this image, is used to change which warp threads are raised and which are lowered. This makes it much easier to weave the yarn in an alternating over-under pattern; otherwise, I'd have to do it thread-by-thread with a yarn needle.
My specific loom, the Lacis Kliot tapestry loom, uses a string heddle - the warp threads are attached to the rods with loops of string, and raised or lowered depending on the angle of the shed-change device.